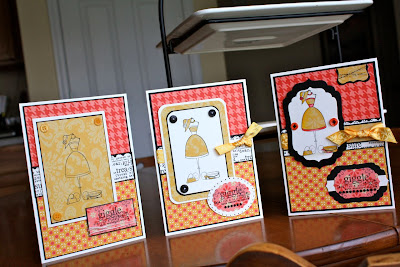
A few months back, I was commissioned to do an article for a European version of Stamping Trends. After much back and forth between publishers, it looks like the magazine is never actually going to be published so I thought that I would share my article here with you esp. since the stamping kit that I used for the article is on sale today over at Unity Stamp Co., Treasure to Me.
The article was written to show how you can create a basic card and upgrade it just by making small changes to end up with an awesome card.
I am simply going to cut and paste the article here...wade through it as you please...
Good Better Best article write-up
Card #1...Good
Supplies:
-Unity Stamp Co. Treasure to Me stamp kit
-K&Company Handmade paper collection
-StazOn jet black inkpad
-Fiskars scallop border punch
-white and black card stock
-Autumn Leaves buttons
Step-by-Steps:
- Stamp the dress form image onto the yellow patterned paper. Trim and layer onto the black and white card stocks using the appropriate border sizes.
- Stamp the dictionary image for “treasure” to create a background patterned paper. Trim this and use the border punch to create the scalloped edge.
- Layer the base of the card using the example as your guide.
- Stamp the “giggle” definition. Trim, layer and add the string detail around the bottom.
- Assemble the card finishing it off by gluing the buttons in the corners of the dress form image.
Tip:
By using simple stamped images (i.e. no techniques), you create a clean and simple card that has a very classic style.
Card #2... Better
Supplies:
-Unity Stamp Co. Treasure to Me stamp kit
-K&Company Handmade paper collection
-StazOn jet black inkpad
-Fiskars scallop border punch
-white and black card stock
-Autumn Leaves buttons
-corner rounder
-Marvy Uchida oval punches
-black flat-backed rhinestones
-Zig Writer- black
-ribbon
Step-by-Steps:
- Stamp the dress form image onto the white card stock and a scrap of yellow patterned paper. Paper-piece sections of the image with the yellow paper. Trim and round the corners. Layer onto the black, yellow, and white papers using the appropriate border sizes.
- Stamp the dictionary image for “treasure” to create a background patterned paper. Trim this and use the border punch to create the scalloped edge.
- Layer the base of the card using the example as your guide. Add the yellow ribbon around the center detail and knot it.
- Stamp the “giggle” definition. Punch with the oval punches and layer. Add the flat backed rhinestones and the dot detail with the Zig Writer.
- Assemble the card finishing it off by tying on the buttons in the corners of the dress form image.
Tip:
Simply by adding a bit of paper-piecing to a stamped image, you create much more depth to your overall card effect.
Card #3... Best
Supplies:
-Unity Stamp Co. Treasure to Me stamp kit
-K&Company Handmade paper collection
-StazOn jet black inkpad
-Nestabilities Labels diecut
-white and black card stock
-Autumn Leaves buttons
-Stampin Up punch
-Derwent watercolour pencils
-black flat-backed rhinestones
-ribbon
Step-by-Steps:
- Stamp the dress form image onto the white card stock and a scrap of yellow patterned paper. Paper-piece sections of the image with the yellow paper. Use watercolour pencils to create more depth and shadow to the image and paper-piecing. Trim and layer using the nestabilities labels dies.
- Stamp the dictionary image for “treasure” to create a background patterned paper. Trim this and use the border punch to create the scalloped edge.
- Layer the base of the card using the example as your guide. Be sure to note the added yellow layer to the base of this card. Add the yellow ribbon around the center detail and knot it.
- Stamp the “giggle” definition. Trim and layer using the nestabilities labels dies. Add the flat backed rhinestones.
- Punch the top edge detail using the yellow and black papers. Add the stitching detail and attach to the card.
- Assemble the card finishing it off by tying on the buttons on the sides of the dress form image.
Tip:
Paper-piecing a great and easy technique to use, but you can step it up a notch by mixing it with a bit of watercolour pencil detail. Even by adding a bit of shading to the edges of your paper-pieced pieces, you can achieve a much more gorgeous and detailed effect.
Thought process behind the designs of the cards:
When it came to approaching this challenge, I started with an identical design for each card base. I also kept the overall layout of the card the same on all three cards. I wanted to show how you can simply step up a good design by changing the little details.
Then I simply stepped-up the stamping techniques used on each card, going a bit further and adding a bit more detail on each stamped image. Each step up created a bit more visual interest.
With each step up, I also used more intricate details in the shapes of the pieces. Moving away from the very blocked corners of the first card, to very rounded, stylized shapes on the final card.
All three cards are beautiful as stand-alone cards, but it is amazing when you place all three of them together. You can see how subtle little changes can hugely affect the overall look of the card.


1 comment:
Christi, I am so sorry after all this work it didn't publish, but you know what? I know everyone loves these cards anyway and your write up will help quite a few on how to make one card 3 different ways, so THANK YOU for posting this, regardless! They are really beautiful cards!!!! Hugs...Eva
Post a Comment